I don't know how this has eluded me for so long, but there is actually a very nice interface built into Ubuntu that allows you to connect to servers using any of the following protocols: ftp, ssh, windows share, WebDAV (http), Secure WebDAV (https), and more. This is a nice alternative to using third party software like FireFTP (even though that program rocks) or the command line.
Simply pulling down the Places->Connect to Server... option in GNOME opens a dialog box which allows you to enter the appropriate information about the server you want to connect to. After the connection is successful, a folder representing the remote file system will appear on both the Desktop and in the Places menu. Another nice feature is that the folder even has some little letters on it telling you what protocol it is connecting over. You can now drag and drop files via the Nautilus interface, as if the directory was local. How convenient!
This tip found via the free online book Ubuntu Linux Bible. (Reviews on Amazon) By the way, this is an incredibly comprehensive reference on all things that an end user might want to do on Ubuntu. It also has sections on setting up subversion, using LaTeX, setting up other servers such as Apache, multimedia usage, and just about everything else. UPDATE: Whoops! This actually got posted by mistake by Lifehacker... the book has been taken down... it's still a good book, though!
UPDATE: For some more (unrelated) GNOME fun, right click on an icon and select "Stretch Icon" to blow up the icon to a cartoonish size. Click "Restore Icon's Original Size" in the same menu if you get tired of it (which you will, after 2 seconds).
Showing posts with label server. Show all posts
Showing posts with label server. Show all posts
Tuesday, March 06, 2007

Sunday, August 06, 2006
Server Building, Part 4 (vsftpd configuration)
Here is some information on configuring vsftpd 2.0.3 on Ubuntu 5.10 (Breezy Badger):
The settings for this program are in /etc/vsftpd.conf There is a short manpage for vsftpd ("man vsftpd" is the command) but the manpage for the file ("man vsftpd.conf") gives a more exhaustive description of options that vsftpd offers. Options are set in option=value form in the config file (example: "anonymous_enable=YES"). Most settings are not enabled if they are not found in the config file but there is some default behavior if some settings are not found. Check the manpage and FAQ for details. I'm mostly concerned with setting up access so that only I can get access to this machine. There are a few types of users in the FTP server paradigm: local users (that have an account on the machine), anonymous users (just anyone on the net) and root. Here are some simple options to set to achieve what I want to do:
Anonymous users:
Local users:
Other:
To restart vsftpd with an edited config file (that is, to see the changes you just made to the file put into effect) use this command: /etc/init.d/vsftpd restart
The settings for this program are in /etc/vsftpd.conf There is a short manpage for vsftpd ("man vsftpd" is the command) but the manpage for the file ("man vsftpd.conf") gives a more exhaustive description of options that vsftpd offers. Options are set in option=value form in the config file (example: "anonymous_enable=YES"). Most settings are not enabled if they are not found in the config file but there is some default behavior if some settings are not found. Check the manpage and FAQ for details. I'm mostly concerned with setting up access so that only I can get access to this machine. There are a few types of users in the FTP server paradigm: local users (that have an account on the machine), anonymous users (just anyone on the net) and root. Here are some simple options to set to achieve what I want to do:
Anonymous users:
- anonymous_enable -- allows anonymous login, on by default
- anon_upload_enable -- allows anonymous users to upload files... keep this off unless you want a lot of porn on your server (so they say)
- anon_mkdir_write_enable -- allows anonymous users to use any form of the ftp write command
- no_anon_password -- allow anonymous users to login without a password... probably a good idea to enable this, since the password is just "anonymous" otherwise
Local users:
- local_enable -- allows local users to log in... I enable this so I can log in as myself
- chroot_local_user -- restrict local users to their home directories (apparently a security risk... read the vsftpd FAQ for details)
- chroot_list_enable -- enables a list of users that can use the chroot() command
- chroot_list_file -- the location of the file that specifies the users that can use the chroot() command... with my settings, the users listed in this file have full access to the system whereas the users not listed are restricted to their home directories
Other:
- ftpd_banner -- the message users see when they login
- write_enable -- enable any form of FTP write (allow users to put stuff on server)
To restart vsftpd with an edited config file (that is, to see the changes you just made to the file put into effect) use this command: /etc/init.d/vsftpd restart
Wednesday, July 12, 2006
Server Building, Part 3 (FTP servers, commands)
Onto the software... there are a variety of FTP deamons to choose from, but these two seem to be the most highly regarded ones:
Some other general FTP sites, for those interested:
ftp://vsftpd.beasts.org/users/cevans/untar/vsftpd-1.2.2/FAQ
Here are some helpful admin commands to help set up the FTP server:
- ProFTP: http://www.proftpd.org/
- vsftpd: http://vsftpd.beasts.org/
Some other general FTP sites, for those interested:
- The standard that defines FTP: http://www.faqs.org/rfcs/rfc959.html
- Discussion of active vs. passive FTP: http://slacksite.com/other/ftp.html
- From linuxhomenetworking.com
- http://www.ftpplanet.com/
- http://www.ftpplanet.com/ftpresources/pc_ftpserver.htm
ftp://vsftpd.beasts.org/users/cevans/untar/vsftpd-1.2.2/FAQ
Here are some helpful admin commands to help set up the FTP server:
- ifconfig display helpful TCP/IP information (including your IP address)
- ping confirm a remote host is online and responding; I usually use "ping -c 4 www.google.com" to see if I'm connected on a certain computer
- netstat info about network connections, routing tables, interface stats, masquerade connections and multicast memberships
- host a DNS lookup utility
- ip show/manipulate routing, devices, policy routing and tunnels
- dig another DNS lookup utility
- ftp start the ftp prompt
- bye close the ftp prompt
- open open a connection with a remote host
- close close the connection
- get download a file from the server
- put store a file on the server
- Other commands to navigate on the server are similar to those that you use to move aroud regularly: ls, pwd, etc.
- To do something on your local machine from the ftp prompt, prefix the command with an exclamation mark !
- ? display all the commands the FTP server supports
- bin enable binary mode, for transferring all binary files... most times this will get done automatically, but you don't want to have your music files corrupted when you transfer them in ASCII mode, do you?
- hash print a hash (#) for every kilobyte transferred... good if you want to know if the server is transferring data or just hanging when there's no output
Thursday, July 06, 2006
Server Building, Part 1 (assembly)
I got my parts in the mail today (see last post)... to work!
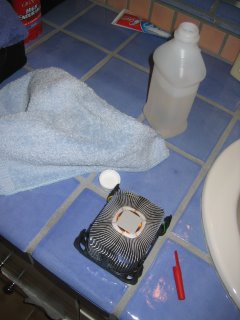
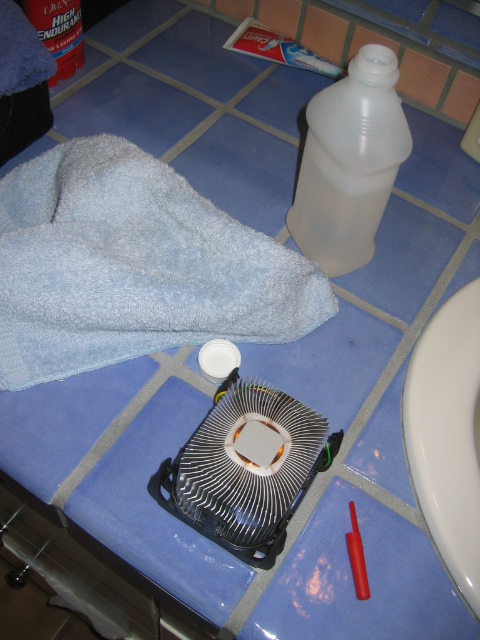
After unpacking all the parts, the first thing I did was to take the "thermal compound" that comes with the heatsink off with isotropl alcohol. There's nothing more annoying than cpus that overheat, which is what tends to happen with heatsinks that use this sorry excuse for a compound. Here is the heatsink ready for the slaughter... after this I smothered my own compund all over the cpu. Pencaps work well for both taking chunks of compound off and lathering them on (hence the red one in this photo):
Then I put the 2 memory sticks into the blue slots. Both the heatsink and the memory need a bit of muscle to install, especially the heatsink.
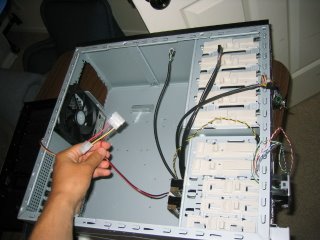
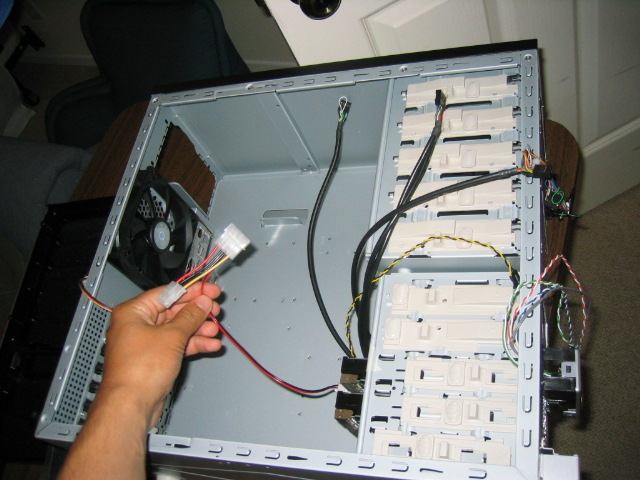
One thing to watch out for before installing the hard disks/anything else: in the Centurion cases, the wire that connects the fan to the motherboard can get stuck behind the casing easily (see photo below)... make sure that doesn't happen early as it will save you from removing a lot of stuff to get at it later.
Power supply installation is easy, just screw it in. Make sure the proper voltage is set, though, that could burn you later.
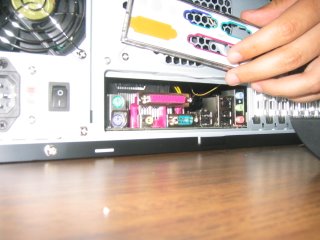
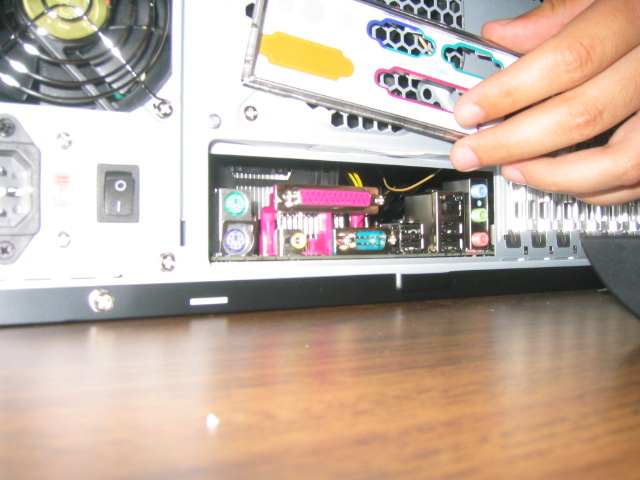
Motherboard installation: more screws, a bit of finesse. One way to line the screw holes up with the holes in the motherboard is to lay the motherboard down and take a permanant marker and mark the holes on the other side and then screw in screws in the marked holes. Be sure to bash out that pesky guard over all the USB ports, etc. on the case before you put the motherboard in:
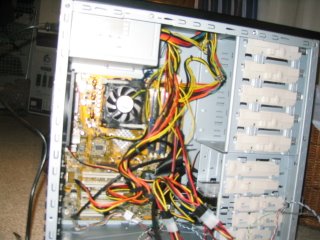
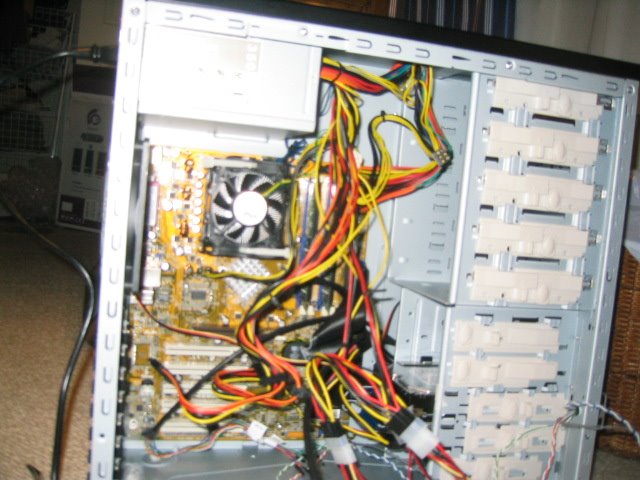
I then slid in the 2 hard drives. With that done, now comes the fun of connecting very very small parts. If my fingers were needlenose pliers, this would be easier. Check your motherboard manual for the details on what goes where. One thing that is always annoying is connecting the led, power, speaker, etc. cables correctly. In any event, it's starting to get a bit hairy in there...
Alright, time for the moment of truth... I turn it on (flip the switch on the back from O to | ) and the motherboard LED lights up, which means it's getting power. That's good. I hit the power button and... everything (fans, LEDs, etc.) seem to be working. Except there's two beeps instead of the healthy one. Hmmm. Time to loan one of my monitors from my current PC to this one to figure out what's going on...
After unpacking all the parts, the first thing I did was to take the "thermal compound" that comes with the heatsink off with isotropl alcohol. There's nothing more annoying than cpus that overheat, which is what tends to happen with heatsinks that use this sorry excuse for a compound. Here is the heatsink ready for the slaughter... after this I smothered my own compund all over the cpu. Pencaps work well for both taking chunks of compound off and lathering them on (hence the red one in this photo):
Then I put the 2 memory sticks into the blue slots. Both the heatsink and the memory need a bit of muscle to install, especially the heatsink.
One thing to watch out for before installing the hard disks/anything else: in the Centurion cases, the wire that connects the fan to the motherboard can get stuck behind the casing easily (see photo below)... make sure that doesn't happen early as it will save you from removing a lot of stuff to get at it later.
Power supply installation is easy, just screw it in. Make sure the proper voltage is set, though, that could burn you later.
Motherboard installation: more screws, a bit of finesse. One way to line the screw holes up with the holes in the motherboard is to lay the motherboard down and take a permanant marker and mark the holes on the other side and then screw in screws in the marked holes. Be sure to bash out that pesky guard over all the USB ports, etc. on the case before you put the motherboard in:
I then slid in the 2 hard drives. With that done, now comes the fun of connecting very very small parts. If my fingers were needlenose pliers, this would be easier. Check your motherboard manual for the details on what goes where. One thing that is always annoying is connecting the led, power, speaker, etc. cables correctly. In any event, it's starting to get a bit hairy in there...
Alright, time for the moment of truth... I turn it on (flip the switch on the back from O to | ) and the motherboard LED lights up, which means it's getting power. That's good. I hit the power button and... everything (fans, LEDs, etc.) seem to be working. Except there's two beeps instead of the healthy one. Hmmm. Time to loan one of my monitors from my current PC to this one to figure out what's going on...
Monday, July 03, 2006
Ordered server hardware
I began my quest of building a file/web server today... here are the purchases I made from the fabulous (and cheap, and convenient, etc.) newegg:
The total for all of this stuff is around $550. I'm planning to set up apache and a file server on this baby, along with RAID 1 so I don't lose any of those valuable, valuable mp3s.
- CoolerMaster case: I already have one of these for my primary desktop... very good design with the "tool-less" install
- 2x256 Corsair memory sticks: Basically, the cheapest reliable memory I could find
- Asus P4S800D Motherboard: Again, cheap (and hopefully reliable) motherboard
- Antec SP-350 Power Supply: cheap power supply
- Intel Celeron D310 2.13GHz processor: The cheapest processor I could find... (more than 2 GHz these days!)
- Rosewill RK-680 USB Keyboard: cheapest keyboard I could find
- Evga MX4000 Graphics card: cheap graphics card
- 2 Seagate 300GB hard drives: these 2 babies account for almost half the price of the total package
The total for all of this stuff is around $550. I'm planning to set up apache and a file server on this baby, along with RAID 1 so I don't lose any of those valuable, valuable mp3s.
Subscribe to:
Posts (Atom)