Saturday, July 29, 2006

Waseem comes to the Linux/Wireless rescue

Waseem just helped me configure my wireless on my Compaq laptop (that is now running Ubuntu Dapper Drake). Any network that is publicly accessible will be viewable (if, of course the wireless card/network is enabled) in the drop-down box in Network Setting --> wireless --> Properties. It will not automatically connect to any network it senses. Here is some command line wizardry to help configure wireless settings:
  1. Need to know name of network interface -- type in iwconfig to find that out (usually its name is eth1 or the like)
  2. Then you want to scan the nearby places to see what networks you can use -- iwlist < network > scan returns a list of potentially usable networks... it also tells you if you need an encyption key (password) to access the network
  3. To tell your network card that you want to use a certain network -- iwconfig <network> essid <name>
  4. Now to tell it the password (if neccesssary) -- iwconfig <network> key <password> (Waseem isn't sure if this is the same accross networks... some require hex keys, some require ASCII keys, etc.)
  5. Now you need to tell Linux "I want to start using this connection" -- ifconfig <network> up (of course, to turn it off, the same command with down instead of up)
  6. To get an IP address using DHCP -- dhclient < network >
  7. If you're not using DHCP, you need to tell ifconfig about the IP address request (Waseem isn't sure how to do this)
Command summary:
  • iwconfig -- configure a wireless network interface
  • ifconfig -- configure a network interface
  • iwlist -- get more detailed information from a wireless interface
Edit: As I've gotten to school, I've noticed a problem: for some reason my comp gets confused when there's multiple wireless networks with the same name; or, rather, one wireless network with multiple routers broadcasting the same network. I need to specify the router's MAC address if I want to connect. Here are the commands:
  1. Tell your interface that you want to roam on a network: iwconfig <network> mode Managed
  2. Specify the connection point: iwconfig <network> ap <MAC address>
  3. From here it's the same as any wireless connection: ifconfig <network> up
  4. Request an IP address: dhclient <network>

Wednesday, July 12, 2006

Server Building, Part 3 (FTP servers, commands)

Onto the software... there are a variety of FTP deamons to choose from, but these two seem to be the most highly regarded ones:
I chose vsftpd because I saw several message board threads which claimed that it was very easy to configure and incredibly secure.

Some other general FTP sites, for those interested:
I installed vsftpd with a simple "sudo apt-get install vsftpd" (thanks again, Ubuntu!). Two of the major issues one faces when setting up an FTP deamon (which basically allows certain people access to the server's file system depending on who they are and what the admin wants them to see) are what local users (users that have an account on the computer) can do and what anonymous users (strangers) can do. Variables in the etc/vsftpd.conf file that have "local" or "anonymous" or "anon" in them pretain to these issues. Use the command "man vsftpd.conf" to find out more about what commands you can put in the conf file. If you are configuring vsftpd, the faq page, in addition to the manpage, will be your best friend:
ftp://vsftpd.beasts.org/users/cevans/untar/vsftpd-1.2.2/FAQ

Here are some helpful admin commands to help set up the FTP server:
  • ifconfig display helpful TCP/IP information (including your IP address)
  • ping confirm a remote host is online and responding; I usually use "ping -c 4 www.google.com" to see if I'm connected on a certain computer
  • netstat info about network connections, routing tables, interface stats, masquerade connections and multicast memberships
  • host a DNS lookup utility
  • ip show/manipulate routing, devices, policy routing and tunnels
  • dig another DNS lookup utility
Here are some commands to query an ftp server:
  • ftp start the ftp prompt
  • bye close the ftp prompt
  • open open a connection with a remote host
  • close close the connection
  • get download a file from the server
  • put store a file on the server
  • Other commands to navigate on the server are similar to those that you use to move aroud regularly: ls, pwd, etc.
  • To do something on your local machine from the ftp prompt, prefix the command with an exclamation mark !
UPDATE: Some more helpful stuff, found via Ubuntu Linux Bible.
  • ? display all the commands the FTP server supports
  • bin enable binary mode, for transferring all binary files... most times this will get done automatically, but you don't want to have your music files corrupted when you transfer them in ASCII mode, do you?
  • hash print a hash (#) for every kilobyte transferred... good if you want to know if the server is transferring data or just hanging when there's no output
The good news is that the server is working. The bad news is that it is not accessible behind my building's firewall. I went to see the basement where all the wires go, but I don't think people would be to happy if I started unplugging stuff to test how the system worked. I'll ask the admin for more details when he gets off his vacation...

Saturday, July 08, 2006

Server Building, Part 2 (RAID setup)

Whoops! I forgot to get a CD drive for loading the OS. Silly me. A quick stop to Fry's (Palo Alto) solved this problem (I also bought some ribbon cable for connecting the new IDE CD drive to the motherboard).

A bit more tweaking of those small wires and... voila! Hardware is all working fine now. Then, a quick install of the CD drive and close everything up. Off to the BIOS!

Setting up RAID is really easy on Ubuntu 6.06 (Dapper Drake). I used this site as a guide. Just format 2 partitions as RAID partitions of equal size (but don't forget swap partitions as well!), select RAID 1 and you're off! I got through the minimal configuration and more significant waiting during the OS setup phase and now I have a command prompt just tempting me to use it. Right now I'm researching FTP servers. Stay tuned.

UPDATE: This site has a much more detailed RAID setup guide.

Thursday, July 06, 2006

Server Building, Part 1 (assembly)

I got my parts in the mail today (see last post)... to work!

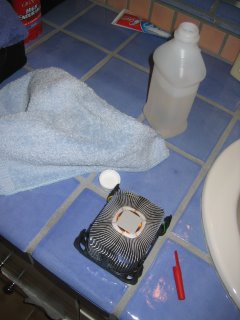
After unpacking all the parts, the first thing I did was to take the "thermal compound" that comes with the heatsink off with isotropl alcohol. There's nothing more annoying than cpus that overheat, which is what tends to happen with heatsinks that use this sorry excuse for a compound. Here is the heatsink ready for the slaughter... after this I smothered my own compund all over the cpu. Pencaps work well for both taking chunks of compound off and lathering them on (hence the red one in this photo):


Then I put the 2 memory sticks into the blue slots. Both the heatsink and the memory need a bit of muscle to install, especially the heatsink.

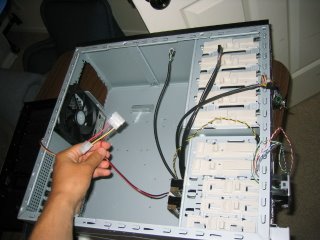
One thing to watch out for before installing the hard disks/anything else: in the Centurion cases, the wire that connects the fan to the motherboard can get stuck behind the casing easily (see photo below)... make sure that doesn't happen early as it will save you from removing a lot of stuff to get at it later.


Power supply installation is easy, just screw it in. Make sure the proper voltage is set, though, that could burn you later.

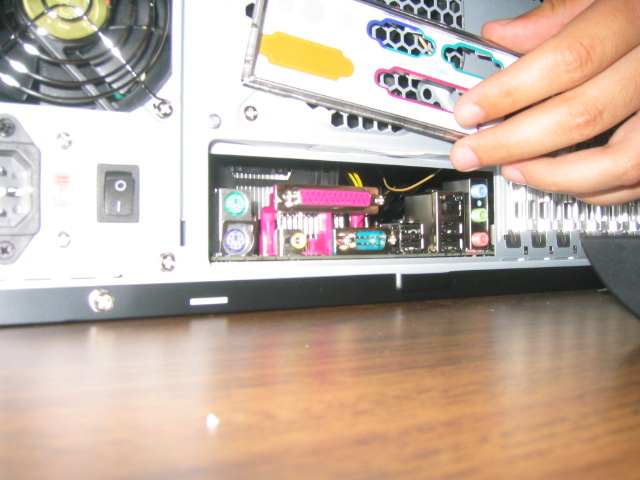
Motherboard installation: more screws, a bit of finesse. One way to line the screw holes up with the holes in the motherboard is to lay the motherboard down and take a permanant marker and mark the holes on the other side and then screw in screws in the marked holes. Be sure to bash out that pesky guard over all the USB ports, etc. on the case before you put the motherboard in:


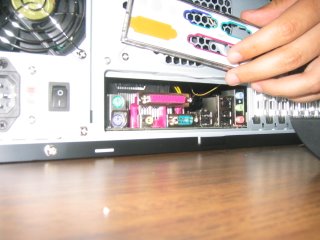
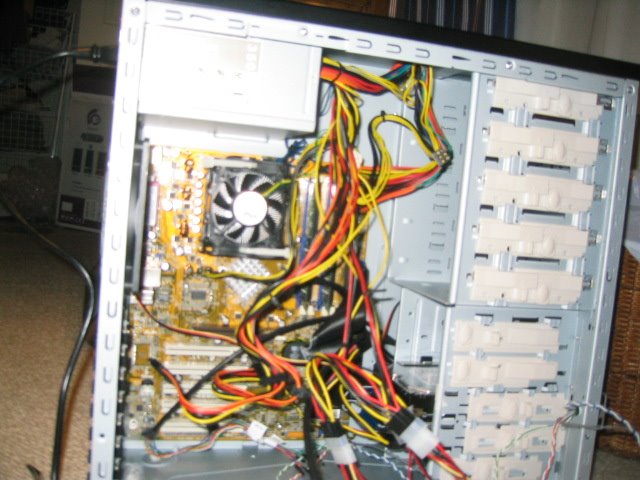
I then slid in the 2 hard drives. With that done, now comes the fun of connecting very very small parts. If my fingers were needlenose pliers, this would be easier. Check your motherboard manual for the details on what goes where. One thing that is always annoying is connecting the led, power, speaker, etc. cables correctly. In any event, it's starting to get a bit hairy in there...


Alright, time for the moment of truth... I turn it on (flip the switch on the back from O to | ) and the motherboard LED lights up, which means it's getting power. That's good. I hit the power button and... everything (fans, LEDs, etc.) seem to be working. Except there's two beeps instead of the healthy one. Hmmm. Time to loan one of my monitors from my current PC to this one to figure out what's going on...

Monday, July 03, 2006

Ordered server hardware

I began my quest of building a file/web server today... here are the purchases I made from the fabulous (and cheap, and convenient, etc.) newegg:
  • CoolerMaster case: I already have one of these for my primary desktop... very good design with the "tool-less" install
  • 2x256 Corsair memory sticks: Basically, the cheapest reliable memory I could find
  • Asus P4S800D Motherboard: Again, cheap (and hopefully reliable) motherboard
  • Antec SP-350 Power Supply: cheap power supply
  • Intel Celeron D310 2.13GHz processor: The cheapest processor I could find... (more than 2 GHz these days!)
  • Rosewill RK-680 USB Keyboard: cheapest keyboard I could find
  • Evga MX4000 Graphics card: cheap graphics card
  • 2 Seagate 300GB hard drives: these 2 babies account for almost half the price of the total package

The total for all of this stuff is around $550. I'm planning to set up apache and a file server on this baby, along with RAID 1 so I don't lose any of those valuable, valuable mp3s.